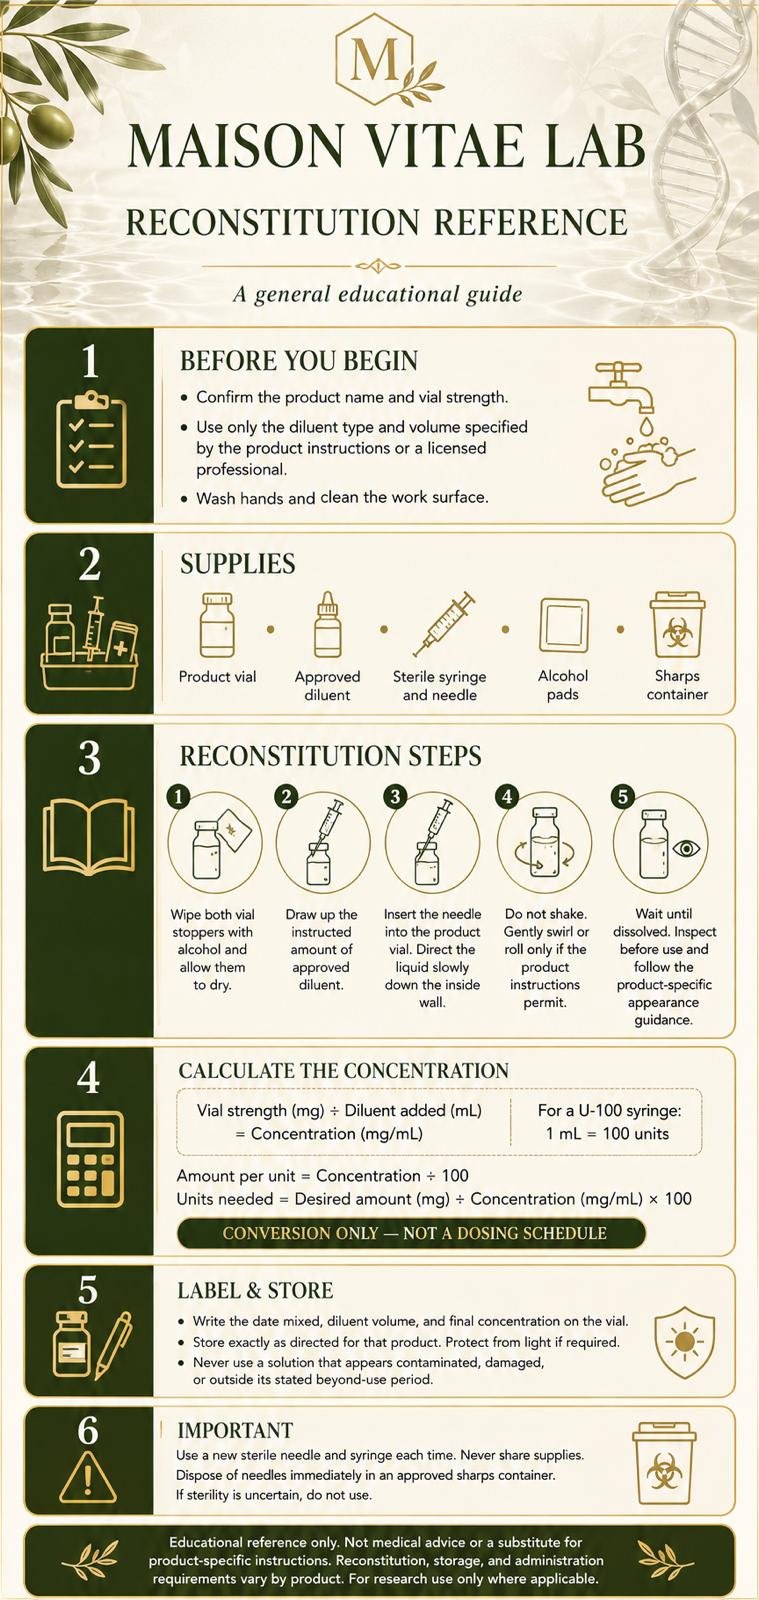
Reconstitution Reference Guide
Reconstitution is the process of adding an approved liquid diluent to a dry or lyophilized product to prepare it for its intended use. Because reconstitution requirements vary, always follow the product-specific instructions or directions provided by a licensed professional.
This general guide does not provide a dosing schedule and should not replace product-specific preparation, storage, or administration instructions.
Before You Begin
Before reconstituting any product:
- Confirm the product name and vial strength.
- Check the expiration or beyond-use date.
- Inspect the vial for damage, contamination, or a broken seal.
- Confirm the correct diluent and the exact amount required.
- Wash your hands thoroughly.
- Clean and disinfect your work surface.
- Gather all necessary supplies before beginning.
“`
“`
Supplies Needed
- Product vial
- Approved diluent
- New sterile syringe and needle
- Alcohol preparation pads
- Clean work surface
- Approved sharps disposal container
- Vial label or permanent marker
Step-by-Step Reconstitution Instructions
“`
Step 1: Prepare the Vials
Remove the protective caps from the product vial and diluent vial without removing or touching the rubber stoppers.
Wipe each rubber stopper thoroughly with a new alcohol pad. Allow the alcohol to air-dry completely before inserting a needle.
Step 2: Draw Up the Diluent
Open a new sterile syringe and needle.
Remove the needle cap without touching the needle. Insert the needle into the diluent vial and withdraw the exact amount of liquid specified in the product instructions.
Check the syringe for large air bubbles and confirm that the correct volume has been drawn.
Step 3: Add the Diluent Slowly
Insert the needle through the center of the product vial’s rubber stopper.
Angle the needle so the diluent flows slowly down the inside wall of the vial rather than directly onto the powder. Slowly depress the plunger until all the diluent has been transferred.
Do not force the liquid into the vial or create unnecessary pressure.
Step 4: Allow the Product to Dissolve
Remove the needle and place the connected needle and syringe directly into an approved sharps container.
Do not shake the vial. If permitted by the product instructions, gently swirl or roll the vial between your hands until the product is completely dissolved.
Some products may require several minutes to dissolve fully.
Step 5: Inspect the Reconstituted Product
Examine the solution carefully under adequate lighting. Follow the product-specific instructions regarding its expected color and appearance. Do not use the product if the vial is damaged, sterility is uncertain, or the solution has unexpected particles, discoloration, cloudiness, or contamination.
“`
Calculating the Final Concentration
Use the following formula:
“`
Final concentration is determined by dividing the vial strength in milligrams by the volume of diluent added in milliliters.
“`
U-100 Syringe Conversion Reference
“`
On a U-100 insulin syringe:
- 1 mL = 100 units
- 0.5 mL = 50 units
- 0.25 mL = 25 units
- 0.10 mL = 10 units
- 0.01 mL = 1 unit
To determine the amount contained in one syringe unit:
To calculate the number of units corresponding to a particular amount:
These formulas are provided as a mathematical conversion reference only. They are not a dosing schedule or recommendation.
“`
Label the Reconstituted Vial
After reconstitution, clearly label the vial with:
- Product name
- Vial strength
- Type of diluent used
- Amount of diluent added
- Final concentration
- Date and time reconstituted
- Required discard or beyond-use date
Storage
Storage requirements vary by product. Follow the exact temperature, light-protection, handling, and beyond-use instructions provided for the specific product.
- Refrigerate only when directed.
- Protect the vial from light when required.
- Keep the vial upright and securely closed.
- Avoid freezing unless specifically permitted.
- Do not repeatedly expose the vial to temperature changes.
- Keep the product away from children and unauthorized individuals.
- Discard the product after its stated beyond-use period.
Do not assume every reconstituted product has the same refrigerated shelf life.
Sterility and Handling Precautions
- Use a new sterile needle and syringe each time a vial is accessed.
- Never reuse or share needles or syringes.
- Never enter a vial with previously used equipment.
- Avoid touching the needle, syringe tip, or disinfected vial stopper.
- Do not use supplies with damaged or opened packaging.
- Immediately place used needles and syringes in an approved sharps container.
- Do not recap, bend, break, or remove a used needle before disposal.
- If sterility is uncertain, do not use the product.
Important Disclaimer
This information is provided for general educational and mathematical reference only. It is not medical advice, a dosing recommendation, or a substitute for product-specific instructions or guidance from a licensed healthcare professional.
“`
“`